Showing posts with label Medium Puzzles. Show all posts

Thursday, October 22, 2026

The Compass Behind Five Plaques

Case 49 · truth-count deduction · Medium · About 5-10 minutes

A brass compass is hidden in one of five closed drawers. Above the drawers are five statements. A single reliable note says that exactly two statements are true. That is the entire trick: no witness changes their story, and no drawer is secretly empty and full at once.

Read the plaques as statements about the compass’s location. The letter on a plaque names the plaque, not necessarily the drawer it describes.

Closed antique drawers with blank brass plaques sit under an amber lamp.
Generated story illustration. The complete puzzle evidence is given in the text.

Five plaques, one compass

The drawers are A, B, C, D, and E. Exactly one drawer contains the compass. All other drawers are empty. The five statements are:

  • Plaque A: The compass is in drawer A or drawer B.
  • Plaque B: The compass is not in drawer C.
  • Plaque C: The compass is in drawer D or drawer E.
  • Plaque D: The compass is in drawer A.
  • Plaque E: The compass is not in drawer E.

The separate note guarantees that exactly two of those five statements are true. Every other statement is false. “Or” has its ordinary inclusive meaning; with only one compass, both named drawers cannot contain it anyway.

Which drawer should you open? Give the drawer and identify its two true plaques. Then show why no other drawer fits the note.

You can solve by testing the five possible locations. Keep the candidate location fixed while evaluating all five plaques. Do not decide that a plaque is true merely because it is attached to the right drawer.

Hint 1 - reveal when you want a nudge

There are five candidate locations, not five independent hidden objects. Test one candidate at a time.

Hint 2 - reveal when you want a nudge

If the compass is in E, both negative statements need careful reading: “not in C” is true, but “not in E” is false.

Reveal the solution and explanation

Open drawer E. Plaques B and C are the two true statements.

With the compass in E, plaque A is false because neither A nor B contains it. Plaque B is true because E is not C. Plaque C is true because the compass is in one of D or E. Plaque D is false because A is empty. Plaque E is false because the compass really is in E. The total is exactly two.

Testing the remaining locations proves uniqueness. In A, plaques A, B, D, and E are true, for a total of four. In B, A, B, and E are true, for three. In C, only E is true, for one. In D, B, C, and E are true, for three. None gives two.

The lesson is a useful one for statement puzzles: evaluate claims against a proposed world. Do not assume that a truthful statement must have been placed beside the hidden object. Here the plaque attached to the correct drawer is itself false.

Solve another: The Cabinet of Fifty Mysteries · Browse all 50 cases

The Counterfeit in the Conservator’s Tray

Case 48 · balance deduction · Medium · About 7-12 minutes

An empty brass balance stands beside a tray of plain metal tokens and conservator tools.
Generated story illustration. The complete puzzle evidence is given in the text.

Eight metal tokens are laid out for an exhibition. Seven have exactly the same weight. One is counterfeit and is either heavier or lighter than a genuine token. The conservator has already made three balance-scale comparisons.

You do not get another weighing. The three recorded results contain enough information to name the token and the direction of its weight difference.

The evidence

The tokens are labeled A, B, C, D, E, F, G, and H. Each listed group contains three tokens. The scales are accurate, and every genuine token has the same weight. The counterfeit differs by a nonzero amount. No token changes weight during the test.

Left panRight panObserved result
A, B, CD, E, FLeft is lighter
A, D, GB, C, ELeft is heavier
B, E, HA, C, GLeft is heavier

Which token is counterfeit? Is it heavier or lighter?

The picture sets the scene. Token positions or apparent sizes in that illustration are not measurements. Only the labeled comparisons above count as evidence.

A compact notation can help. Write “C light” for the possibility that C is the counterfeit and is too light. For each possibility, predict all three results. A possibility survives only if every prediction matches. You never need to know the counterfeit's precise weight.

Hint 1 - reveal when you want a nudge

After the first weighing, G and H are genuine. The counterfeit is either a light token on the left or a heavy token on the right.

Hint 2 - reveal when you want a nudge

The first two results leave B light, C light, and D heavy. Let the third result separate them.

Reveal the solution and explanation

C is counterfeit, and it is lighter than a genuine token.

The first result permits six possibilities: A light, B light, C light, D heavy, E heavy, or F heavy. A light would make the second left pan lighter, so reject it. E heavy would also make that left pan lighter. F heavy is absent from the second comparison and would leave it balanced. Reject both.

That leaves B light, C light, and D heavy. In the third weighing, B is on the left. A light B would make the left pan lighter, contrary to the record. D is on neither pan. A heavy D would make the two pans balance. A light C, however, sits on the right and makes the left pan heavier. Only C light matches.

It also explains the first two results directly. C is on the first left pan, making it lighter. C is on the second right pan, making the left heavier. The third right pan also contains C, so the left is heavier again. This proves both the token's identity and whether it is heavy or light.

Solve another: The Cabinet of Fifty Mysteries · Browse all 50 cases
The Night Ferry and the Connection You Cannot Catch

Case 46 · timetable deduction · Medium · About 5-10 minutes

The island archive closes its parcel hatch at 08:30. You are waiting at Quay at 07:58 with a small box that must reach Island as early as possible. The harbor clerk offers a timetable. One tempting connection is too tight.

Every time below is exact. There are no delays, shortcuts, or other services. Your task is to find the earliest possible arrival, rather than merely an arrival before closing.

An early-morning ferry approaches a stone lock while an archivist waits with a parcel.
Generated story illustration. The complete puzzle evidence is given in the text.

The harbor rules

You may wait at any stop. Changing boats requires at least two full minutes between arrival and departure. This also applies at Quay before your first departure. A boat departs on time; arriving one minute before departure is too late to board.

FromToDepartsArrives
QuayLock08:0008:12
QuayGlass08:0008:08
GlassIsland08:0908:20
GlassReed08:1208:18
LockReed08:1408:19
LockIsland08:1508:26
ReedIsland08:2008:29

What route gives the earliest legal arrival at Island? Give the arrival time and explain why the apparently faster alternative fails.

A useful way to work is to write the earliest time you are ready to board at each stop. That time is two minutes after arrival. Do not confuse reaching a pier with being ready to leave it.

Hint 1 - reveal when you want a nudge

There are only three listed arrivals at Island. Test the earliest one first.

Hint 2 - reveal when you want a nudge

Arriving at Glass at 08:08 makes you ready to board at 08:10.

Reveal the solution and explanation

Take Quay to Lock at 08:00, then Lock to Island at 08:15. You arrive at 08:26.

The first boat reaches Lock at 08:12. Your two-minute change is complete at 08:14, so the 08:15 departure is legal. You started at Quay at 07:58, which also satisfies the first boarding requirement.

The timetable's 08:20 Island arrival looks better. It belongs to the boat leaving Glass at 08:09. Your only way to Glass arrives at 08:08. You would need to be there by 08:07 to catch that boat, so this connection cannot be made.

The remaining Island arrival is 08:29 from Reed. You can reach it by Quay-Glass-Reed: 08:18 plus two minutes permits boarding at 08:20. Quay-Lock-Reed fails because 08:19 plus two minutes is 08:21. Either way, no Reed route beats 08:26. These are all listed Island arrivals, so the earliest legal choice is unique.

Solve another: The Cabinet of Fifty Mysteries · Browse all 50 cases

Three Registers and One Surviving Letter

Case 45 · wordplay / sets · Medium · About 7–10 minutes

Three blank open ledgers and brass instruments on an observatory desk in moonlight.
AI-generated atmospheric illustration. It contains no puzzle evidence; use the complete written clues.

An observatory clerk keeps three registers for every delivery. Two registers record possible letters; the third lists letters that must be rejected. The surviving characters identify one direction.

There are five deliveries, and their row order is fixed. You need no compass, star knowledge, or interpretation of the accompanying art.

For each row, find the letters occurring in both A and B. Then discard any of those letters that also occurs in C. Exactly one distinct letter will remain in each row.

RowABC
1LANTERNNOODLELEAF
2COPPERORCHIDCRISP
3RAVENBRIARCABIN
4THIMBLESTONEHONEY
5SHADOWHEARTHWART

Read the five survivors from row 1 to row 5. What direction is recorded?

Repeated occurrences do not matter. Treat a letter as either present or absent in each word. You are not subtracting letter counts, matching positions, finding anagrams, or choosing a shared sound. All strings use their exact printed uppercase spellings.

For a separate miniature example, if A were ABC, B were BCD, and C were B, the common letters would be B and C; rejecting B would leave C. That example is not an extra message row.

Hint 1 - reveal when you want a nudge

Make the shared-letter list before consulting C. A letter found only in A cannot survive, even if it is absent from C.

Hint 2 - reveal when you want a nudge

In row 1, LANTERN and NOODLE share L, E, and N. LEAF removes L and E, leaving N.

Reveal the solution and explanation

The direction is NORTH.

  • Row 1: the common letters are L, E, N. C removes L and E, leaving N.
  • Row 2: the common letters are C, O, R. CRISP removes C and R, leaving O.
  • Row 3: the common letters are A and R. CABIN removes A, leaving R.
  • Row 4: the common letters are T and E. HONEY removes E, leaving T.
  • Row 5: the common letters are H and A. WART removes A, leaving H.

Each row therefore has one survivor before the five letters are combined. The recognizable direction confirms the extraction but is not needed to choose among multiple surviving letters.

A complete check tests every alphabet letter for three conditions: present in A, present in B, and absent from C. Applying that test independently to all five rows gives the singleton sets N, O, R, T, H. Extra occurrences such as the repeated O in NOODLE or R in BRIAR do not change membership. Reading the rows backward would contradict the stated order and is not an alternative solution.

Solve another: The Cabinet of Fifty Mysteries · Browse all 50 cases

Five Word Tickets in Five Coat Pockets

Case 42 · word logic · Medium · About 8–12 minutes

Blank tickets in red cloth pockets along an old theater cloakroom counter.
AI-generated atmospheric illustration. It contains no puzzle evidence; use the complete written clues.

A cloakroom attendant has placed five word tickets in a row of pockets. She remembers relationships between the spellings better than she remembers the pocket numbers. Her four notes are enough to reconstruct the row.

The names are printed words rather than colors you must distinguish. Even if every ticket were gray, the puzzle would be unchanged.

The pockets are numbered 1–5 from left to right. Put one of these tickets in each pocket, using every ticket exactly once:

AMBER · COBALT · CINDER · SILVER · VELVET

All four notes are true:

  1. COBALT lies somewhere to the left of the only ticket whose spelling repeats a letter.
  2. The only five-letter ticket is immediately to the right of that repeated-letter ticket.
  3. SILVER is immediately to the left of the ticket containing N.
  4. The ticket containing M lies somewhere to the left of the ticket containing N.

What are the five tickets, in left-to-right order?

“Somewhere to the left” allows a gap. “Immediately to the left” or “immediately to the right” means neighboring pockets. A letter is repeated if it occurs at least twice within the same printed word. There is no requirement that the tickets be sorted alphabetically or by color.

You may move paper slips while solving, but the five written spellings contain all the information needed.

Hint 1 - reveal when you want a nudge

VELVET is the only ticket with repeated letters, and AMBER is the only five-letter ticket. These two must form a neighboring pair in that order.

Hint 2 - reveal when you want a nudge

SILVER and CINDER form the other neighboring pair. AMBER must precede CINDER, so the two pairs cannot be placed in either order freely.

Reveal the solution and explanation

The order is COBALT, VELVET, AMBER, SILVER, CINDER.

VELVET repeats V and E; the other four words have no repeated letter. AMBER alone has five letters. Note 2 therefore joins VELVET–AMBER into one two-pocket block.

CINDER is the only word containing N. Note 3 joins SILVER–CINDER into the other two-pocket block. AMBER is the only word containing M, so note 4 requires AMBER before CINDER. Because the two blocks cannot overlap, VELVET–AMBER must come before SILVER–CINDER.

The remaining ticket is COBALT. Note 1 puts it before VELVET, so it must come before both blocks. The three units have lengths 1,2, and 2 and occupy all five pockets. No gaps or alternative placements remain.

For an exhaustive check, there are 120 ways to order five distinct tickets. Testing the four notes against every order leaves exactly the arrangement shown. The argument does not depend on whether AMBER and COBALT suggest actual colors, and the quantities count letters in the printed labels rather than anything in the accompanying art.

Solve another: The Cabinet of Fifty Mysteries · Browse all 50 cases
The Moss Key and the Moving Letters

Case 41 · cipher · Medium · About 10–15 minutes

A conservatory messenger uses a repeating keyword to change the alphabet shift from letter to letter. The keyword has been left in plain sight. The message is secure only against a visitor who skips the operating instructions.

Recover the instruction exactly. No plant identification, historical cipher knowledge, or interpretation of the illustration is required.

A rotating brass device, blank papers and muted tangled threads in a leafy conservatory.
AI-generated atmospheric illustration. It contains no puzzle evidence; use the complete written clues.

Write the alphabet ABCDEFGHIJKLMNOPQRSTUVWXYZ with values A=0 through Z=25.

For encryption, write the keyword MOSS repeatedly underneath the letters of a spaceless message. Add each message-letter value to the key-letter value beneath it. If the total is 26 or more, subtract 26. Convert the result back to a letter.

For example, A encrypted with key B becomes B, because 0+1=1. Z with key C becomes B, because 25+2=27, and 27−26=1.

The complete encrypted message is:

RCDDAKJWPHZJQOV

The key begins at M beneath the first ciphertext letter and continues M–O–S–S–M–O–S–S without resetting. The plaintext has fifteen letters. After decrypting, put spaces at word lengths 6, 3, 6.

What instruction was sent? Every ciphertext character is correct. The example pairs are separate demonstrations and do not use up any part of the repeated keyword.

Hint 1 - reveal when you want a nudge

To undo addition, subtract the key value. When the result is negative, add 26 before converting back to a letter.

Hint 2 - reveal when you want a nudge

The first four key letters are MOSS, with values 12,14,18,18. R−M gives F, C−O wraps to O, and the next two letters each decode to L.

Reveal the solution and explanation

The instruction is FOLLOW RED THREAD.

Repeat the key as MOSSMOSSMOSSMOS. Subtracting its values from RCDDAKJWPHZJQOV, with alphabet wraparound, gives FOLLOWREDTHREAD. The specified lengths divide it into FOLLOW, RED, and THREAD.

The first letter is a direct subtraction: R has value 17 and M has value 12, leaving 5, which is F. The second crosses the alphabet boundary: C has value 2 and O has value 14;2−14=−12, and adding 26 gives 14, which is O. The key does not start over at RED. It remains aligned with the continuous fifteen-character string.

This is a fully keyed cipher. A solver is not expected to infer MOSS by frequency analysis or guess a password from a picture. Once the key alignment is fixed, each position is a reversible addition modulo 26 and has one possible plaintext letter.

A forward check adds the same key values to the recovered message. It recreates all fifteen printed ciphertext letters, including the wraparound positions. The spacing check is separate:6+3+6 accounts for every letter exactly once.

Solve another: The Cabinet of Fifty Mysteries · Browse all 50 cases
The Beacon’s Alternating Lantern Rows

Case 40 · cipher / binary · Medium · About 8–12 minutes

A harbor signal keeper has copied six rows from a lantern panel. To make the wiring convenient, alternate rows run in opposite directions. The copy preserves every lamp state, and the decoding instructions explain the reversal.

The signal names a destination. You do not need nautical knowledge or to count any lights in the illustration.

A lantern station overlooking sailing boats in a misty harbor at sunset.
It contains no puzzle evidence; use the complete written clues.

Each row contains five bits. A bit is the printed digit 0 or 1. Read odd-numbered rows left to right and even-numbered rows right to left.

  1. 00001
  2. 10001
  3. 01000
  4. 11000
  5. 00110
  6. 00100

After choosing the correct reading direction, assign the five positions weights 16, 8, 4, 2, 1 from left to right. Add the weights whose bits are 1. A 0 contributes nothing.

Convert each total to a letter using A=0, B=1, C=2, …, Z=25. The alphabet is ABCDEFGHIJKLMNOPQRSTUVWXYZ. Totals 26–31 would be invalid, but none should appear after correct decoding.

Read the six resulting letters in row order. What destination is signaled? As a separate example, the already correctly oriented row 00101 totals 4+1=5, giving F. It is not a seventh row of the message.

Hint 1 - reveal when you want a nudge

Correct the direction before applying weights. Reversing an even row can move a 1 from a large weight to a small one.

Hint 2 - reveal when you want a nudge

Row 4 is printed 11000 but must be read as 00011. It totals 2+1=3, so its letter is D.

Reveal the solution and explanation

The destination is BRIDGE.

RowOriented bitsTotalLetter
1000011B
21000117R
3010008I
4000113D
5001106G
6001004E

Rows 2 and 6 look unchanged when reversed because their bit patterns are symmetrical. They still obey the alternating rule. It is row 4 that makes ignoring that rule visibly fail:11000 totals 24, which would produce Y instead of D.

The zero-based alphabet is equally important. Using A=1 would shift every interpretation and would contradict the supplied example, where a total of 5 means F.

Uniqueness follows at each stage: the row number fixes orientation, the five weights fix a total, and each permitted total fixes one letter. Encoding BRIDGE back into five-bit values and reversing its even rows returns all six printed rows exactly. This check uses the actual digits, independent of any expectation about a harbor destination.

Solve another: The Cabinet of Fifty Mysteries · Browse all 50 cases

The Weaver’s Inward Reading

Case 38 · code-breaking / spatial text · Medium · About 6–10 minutes

A paper weaver has filled a small square with an instruction. Reading its rows produces almost a word, then fragments. The maker’s route, however, is written clearly on the back.

The square below is the complete puzzle. The accompanying illustration is decorative, and no particular thread, color, or object in it needs to be interpreted.

Cream paper ribbons interlaced on a wooden loom in a bright studio.
It contains no puzzle evidence; use the complete written clues.

Start at the upper-left letter. Read that cell, then move right one cell at a time. If the next step would leave the square or enter a cell already read, turn clockwise and continue. Clockwise direction changes are right → down → left → up → right.

Read every cell exactly once and stop after sixteen letters. Do not skip cells, move diagonally, or turn before an obstacle requires it.

LOOK
EVAU
HESN
TRED

For accessible transcription, the rows from top to bottom are LOOK / EVAU / HESN / TRED. Each slash marks a new row, not a character.

Separate the recovered message into words of lengths 4, 5, 3, 4. What instruction does the weaver give?

Hint 1 - reveal when you want a nudge

The first turn occurs after K at the top-right corner. Continue downward through U, N, and D.

Hint 2 - reveal when you want a nudge

The outer boundary reads LOOKUNDERTHE. Four unread cells remain in a smaller central square; keep the same turning rule.

Reveal the solution and explanation

The instruction is LOOK UNDER THE VASE.

The top row gives LOOK. The right edge contributes UND. The bottom row, now read from right to left without repeating its corner, contributes ERT. The left edge upward contributes HE. Those twelve perimeter cells therefore give LOOKUNDERTHE.

From the E at row 2, column 1, another upward step would revisit the already read top-left cell. Turn right into the center. The remaining path visits V at row 2, column 2; A at row 2, column 3; S at row 3, column 3; and E at row 3, column 2. That completes VASE.

The supplied lengths split the sixteen letters unambiguously into four words. Every grid cell occurs once in the account above, with no duplicated corner letters. The movement is uniquely determined because a turn is permitted only when the current forward step is blocked by the boundary or prior path.

This is a route through printed characters, so the instruction remains available if the illustration is omitted or the puzzle is read aloud using row-and-column coordinates. Finding a vase in the artwork is neither necessary nor a substitute for decoding the square.

Solve another: The Cabinet of Fifty Mysteries · Browse all 50 cases

The Nameplate Seller’s One False Description

Case 35 · word riddle / deduction · Medium · About 6–9 minutes

A market stall has six wooden nameplates. The seller will give you one, but her description contains exactly one false statement. She promises that all the others are true.

This is a riddle about the printed names, not the properties of wood, plants, masonry, or musical instruments. Every fact needed for the answer is visible in the words.

Blank wooden nameplates hanging in a lantern-lit night market stall.
It contains no puzzle evidence; use the complete written clues.

The possible nameplates are:

RAVEN · CEDAR · MAPLE · STONE · BRICK · FLUTE

The seller makes these four statements about the correct word:

  1. It contains the letter A.
  2. In ordinary alphabetical order it falls strictly after BRICK and strictly before FLUTE.
  3. Its last letter is R.
  4. Its third letter is not D.

Exactly one of these four statements is false for the correct nameplate. It is not enough to satisfy one statement, or to find a word with at least one false statement.

Which nameplate should you take, and which statement is the false one?

Compare the written uppercase spellings exactly as shown. “Strictly” excludes the endpoints BRICK and FLUTE themselves. Alphabetical order means comparing letters from left to right, using the first position where the words differ. The familiar alphabet is ABCDEFGHIJKLMNOPQRSTUVWXYZ.

Hint 1 - reveal when you want a nudge

Make four true/false boxes for each candidate. You are looking for a row with three true boxes and one false box.

Hint 2 - reveal when you want a nudge

CEDAR lies between BRICK and FLUTE. Its third letter is D, so check carefully how statement 4 is phrased.

Reveal the solution and explanation

Take CEDAR. Statement 4 is the single false statement.

CEDAR contains A; it follows BRICK and precedes FLUTE alphabetically; and it ends in R. But its third letter is D, so the claim that its third letter is not D is false.

Checking every rival establishes that the answer is unique. RAVEN and MAPLE each satisfy statements 1 and 4, but fail 2 and 3. STONE fails 1,2, and 3, while satisfying 4. BRICK fails 1 and 3 and also fails 2 because the alphabetical comparison is strict. FLUTE fails those same three statements. Both satisfy 4. Thus the candidates have, respectively, two, one, two, three, three, and three false statements in their printed order.

The end words can be tempting because they appear in a clue, but an endpoint is not inside an open interval. Likewise, changing the negative wording of statement 4 would create a different puzzle. Keeping the truth table literal is more dependable than guessing which object sounds most at home in a market story.

Solve another: The Cabinet of Fifty Mysteries · Browse all 50 cases

The Drawer With a Growing Alphabet Shift

Case 34 · cipher · Medium · About 7–10 minutes

A clockmaker dislikes a cipher wheel that stays still. Her encrypted note advances the alphabet setting after every letter, and the mechanism remembers how many letters have already passed.

The note identifies a drawer. Its full operating instructions survived, so the challenge is careful reversal rather than guessing a secret rule.

An old clockmaker’s cabinet of closed drawers above a workbench scattered with small gears.
It contains no puzzle evidence; use the complete written clues.

Use the alphabet ABCDEFGHIJKLMNOPQRSTUVWXYZ, with wraparound after Z.

The clockmaker first removes all spaces from an instruction. She encrypts its first letter by shifting it forward one place, the second by two places, the third by three places, and so on. Letter number fourteen is shifted fourteen places. No position resets at a word boundary.

Her complete ciphertext is:

UCNIYNPZMNCMJSG

There are fifteen letters. Recover them, then restore the spaces using the supplied word lengths: 4, 5, 6.

A miniature example of the method is CAT → DCW: C moves one place to D, A moves two places to C, and T moves three places to W. This example is separate from the drawer instruction; do not count its letters when setting the shift.

What instruction did the clockmaker write? No extra substitution, reversed reading order, or interpretation of the picture is involved.

Hint 1 - reveal when you want a nudge

Number the ciphertext letters 1 through 15. Decryption moves backward by the corresponding number, not forward again.

Hint 2 - reveal when you want a nudge

The first four calculations are U−1=T, C−2=A, N−3=K, and I−4=E. Keep increasing the shift after this first word.

Reveal the solution and explanation

The instruction is TAKE THIRD DRAWER.

Subtracting the position from each encrypted letter yields TAKETHIRDDRAWER. The supplied lengths divide this into TAKE, THIRD, and DRAWER. The spaces are fixed by the instructions rather than supplied by an assumption about sensible English.

Here are useful checkpoints. Position 5 is Y; moving backward five places gives T, the beginning of THIRD. Position 9 is M; moving backward nine places gives D, its final letter. Position 10 is N; moving backward ten places gives D, the beginning of DRAWER. The final G moves backward fifteen places, wrapping around the alphabet, to R.

A common near-solution comes from restarting the count at the second word. That would use a shift of one at position 5, contradicting the rule that spaces were removed before encryption.

Each position has one specified shift, and shifting an alphabet is reversible. Consequently every ciphertext character has exactly one predecessor. As a separate check, encrypting all fifteen recovered characters with shifts 1–15 reproduces UCNIYNPZMNCMJSG character for character. There is no competing key to select by taste or context.

Solve another: The Cabinet of Fifty Mysteries · Browse all 50 cases
The Conservatory’s Misfiled Route Cards

Case 33 · code-breaking / path · Medium · About 8–12 minutes

A snow-covered conservatory gate and a lamplit wooden desk holding blank route cards.
It contains no puzzle evidence; use the complete written clues.

The keeper of a winter garden uses four-letter route cards. A card’s outside letters connect it to other cards; its second letter carries a fragment of the destination password.

Several cards lead somewhere useful eventually. Tonight, however, the gate accepts a journey of one exact length.

Choose and order exactly five different cards from this tray:

VJWE · KTWS · ARPM · KSYP · LFXA · EVXA · QUMV · ESVK · AIZQ · MOQE

  • The first card must begin with L.
  • The last card must end with S.
  • The last letter of each card must equal the first letter of the following card.
  • No card may be used twice. Cards cannot be reversed or altered.

For example, a card ending in Q may be followed by a card beginning with Q. The cards need not spell ordinary words.

Once you have a valid five-card route, read the second letter of each card in route order. What five-letter password opens the gate?

All tray entries are distinct. You must obey the exact route length even if a longer journey also reaches an S-ending card. There are no invisible cards between the printed ones.

Hint 1 - reveal when you want a nudge

Only LFXA can start. After it, the two A-starting cards create the first real choice.

Hint 2 - reveal when you want a nudge

AIZQ forces QUMV and then VJWE. After four cards that route ends at E, with only one card remaining. Can any E-starting card finish at S?

Reveal the solution and explanation

The route is LFXA → ARPM → MOQE → ESVK → KTWS. Its second letters give FROST.

LFXA is forced by the starting rule. If AIZQ follows it, QUMV and VJWE are forced next. Four cards have then been used and the route reaches E. Neither ESVK nor EVXA ends in S, so that branch cannot finish in one more card.

Taking ARPM second instead forces MOQE third. At E, choosing EVXA would leave the route at A after four cards. Neither available A-starting card ends in S. Therefore ESVK must be fourth. It leads to K, where KTWS completes the route and KSYP does not.

That branch analysis considers every choice reachable under the rules. It establishes uniqueness without assuming the password must be a recognizable word. In particular, the longer route through Q and V is not a rival solution: it needs six cards to reach KTWS. Counting cards rather than connections is essential. Five cards contain four joins.

Solve another: The Cabinet of Fifty Mysteries · Browse all 50 cases

The Postmaster’s Backward Stamp

Case 32 · cipher · Medium · About 6–10 minutes

A postmaster uses two small operations to disguise short delivery instructions. He has written down his complete procedure, but left the wheel setting on yesterday’s test slip.

The sealed parcel must go to one destination. Recover the instruction without guessing what would be a sensible place to hide it.

A brass rotating device, blank slips and sealed parcels in a seaside post office at sunset.
It contains no puzzle evidence; use the complete written clues.

Here is the ordinary alphabet:

ABCDEFGHIJKLMNOPQRSTUVWXYZ

To encrypt, move every letter forward by the same number of alphabet positions, wrapping Z back to A. The setting is a whole number from 1 through 9. Then reverse the letters inside each word. Leave the word order and spaces unchanged.

The test slip records an original word and its final encrypted form:

INK → NQL

The parcel’s encrypted instruction is:

QHSR HKW HXOE ARE

Find the setting, then recover the instruction. The test and the parcel use exactly the same procedure and setting. There are no missing letters, extra reversals, or changes to the spaces.

You can make a paper alphabet wheel if useful. Its appearance is optional; an ordinary written alphabet contains everything the method needs.

Hint 1 - reveal when you want a nudge

Undo the final operation first. Reverse NQL before comparing it with INK.

Hint 2 - reveal when you want a nudge

NQL reversed is LQN. I becomes L, N becomes Q, and K becomes N: each move is three places forward.

Reveal the solution and explanation

The setting is 3, and the instruction is OPEN THE BLUE BOX.

The calibration resolves the setting rather than leaving it to the plausibility of the final sentence. Reversing NQL gives LQN. Comparing corresponding letters with INK gives a shift of three in every position. Of the allowed settings 1–9, only 3 maps I to L; the other two letters independently confirm it.

Now reverse each encrypted word: QHSR becomes RSHQ, HKW becomes WKH, HXOE becomes EOXH, and ARE becomes ERA. Move every letter three places backward. The four results are OPEN, THE, BLUE, and BOX.

Notice that the words themselves never exchange positions. Reversing the entire line would undo an operation the postmaster never performed.

For a check in the original direction, shift OPEN forward three places to RSHQ, then reverse it to QHSR. Repeating that check for all four words recreates the complete printed ciphertext. A fixed shift is a one-to-one letter mapping and word reversal is reversible, so the calibrated procedure permits only one plaintext, whether or not a solver recognizes the sentence early.

Solve another: The Cabinet of Fifty Mysteries · Browse all 50 cases

The Curator’s Four Reports

Case 30 · visual · Medium · About 4–7 minutes

A worktable with a closed book, brass key, paintbrush, and feather.
The visible inventory is a clue; the reports must be evaluated using the stated rules.

The curator’s worktable originally held five objects: a book, a key, a brush, a feather, and a spoon. Exactly one has been removed. Four assistants submitted short reports before Vale arrived.

The present table is shown in the evidence picture. Determine which report is completely true and identify the missing object.

The reports

  • Nora: “The book is missing.”
  • Omar: “Both the key and the spoon are on the table.”
  • Pia: “Exactly one of the spoon and the feather is on the table.”
  • Rui: “The brush is present and the book is absent.”

The rules

Exactly one whole report is true. For an “and” or “both” statement, every named condition must hold. “Exactly one” means one is present and the other absent; it does not mean “at least one.”

The four objects left on the table are fully visible. Nothing is inside the book, concealed under another object, or outside the picture. No object was added, exchanged, or removed after this view was recorded. Presence refers only to this table, not to the museum generally.

Accessible evidence transcript

A closed book lies at upper left, a brass key at upper right, a paintbrush at lower left, and a feather at lower right. No spoon is present.

Evaluate the entire sentence in each report. Which assistant gave the true report? Do not identify the remover from the reports: the case provides no rule connecting truthful reporting with responsibility for the removal.

Hint 1 - reveal when you want a nudge

Make a present/absent list from the picture before testing the sentences.

Hint 2 - reveal when you want a nudge

Pia’s “exactly one” and Rui’s “and” impose different conditions. Check both halves of each report.

Reveal the solution and explanation

Pia’s report is true, and the spoon is missing.

Nora is false because the book is present. Omar is false because the key is present but the spoon is not; “both” fails. Pia is true because the feather is present and the spoon is absent, giving exactly one of the pair.

Rui is false. The brush is present, but the book is not absent. One correct half does not make an “and” report true.

The four evaluations are false, false, true, false. They satisfy the guarantee of exactly one true report. The full table view and original five-object inventory identify the missing spoon. They do not reveal who removed it, so assigning blame would go beyond the supplied evidence.

Solve another: The Cabinet of Fifty Mysteries · Browse all 50 cases

Seventeen Minutes Between Two Wrong Clocks

Case 29 · investigation · Medium · About 5–8 minutes

A messenger left the harbor when its clock read 10:18 and reached the station when the station clock read 10:41. A verified timer shows that the journey took exactly seventeen real minutes.

Both wall clocks are wrong. Vale needs the messenger’s real arrival time, rather than an answer copied from either face.

Two antique clocks viewed from their open backs on a railway office bench.
Clock faces are not shown; all timing evidence is in the text.

The clockmaker’s guarantees

  • Each clock differs from real time by a constant whole number of minutes during this journey.
  • Each error is at most four minutes in either direction. A clock may be fast, slow, or accurate within that range.
  • Exactly one clock is two minutes fast. The clockmaker does not say which one.
  • Both readings concern the same morning. There are no hour resets, time-zone changes, date changes, or clock adjustments.

A clock that is two minutes fast displays 10:20 when real time is 10:18. A clock four minutes slow displays 10:14 at that same real instant.

Find each clock’s error and the real departure and arrival times. Use the seventeen-minute journey to compare the errors; do not assume that the difference between the displayed times is the real elapsed time.

The illustration shows clock backs as atmosphere. No visible gear or unmarked object determines a time. Every relevant numerical condition appears above.

Hint 1 - reveal when you want a nudge

The displayed times differ by 23 minutes, while real time increased by 17. The station clock’s error must be 6 minutes greater than the harbor clock’s.

Hint 2 - reveal when you want a nudge

If the harbor clock were 2 minutes fast, what error would that require at the station? Compare it with the 4-minute bound.

Reveal the solution and explanation

The harbor clock is four minutes slow. The station clock is two minutes fast. Real departure was 10:22, and real arrival was 10:39.

The displays advance from 10:18 to 10:41, a difference of 23 minutes. The real journey adds only 17 minutes. The extra 6 minutes must come from the station clock’s error being 6 minutes greater than the harbor clock’s.

If the harbor clock were 2 minutes fast, the station clock would need to be 8 minutes fast. That violates the 4-minute bound. Therefore the station is the clock that is 2 minutes fast, and the harbor’s error is 2−6=−4 minutes.

Add 4 minutes to the harbor reading to get 10:22. Subtract 2 minutes from the station reading to get 10:39. Those real times differ by 17 minutes. The bound rules out the only alternative assignment of the known 2-minute-fast clock, proving uniqueness.

Solve another: The Cabinet of Fifty Mysteries · Browse all 50 cases
The Visit Missing from the Switch Log

Case 28 · logic · Medium · About 5–8 minutes

The museum’s demonstration cabinet has four indicator lights: A, B, C, and D. All four were off before five scheduled staff checks. One check was canceled, but the cancellation mark has vanished from the log.

At the end, A and B are on. C and D are off. Which visit never happened?

A vintage control box with plain brass switches and softly lit indicators.
Use the text’s named lights and states, rather than the drawn control box.

The five scheduled checks

  • Ada: toggle A and B.
  • Basil: toggle B and C.
  • Clio: toggle C and D.
  • Dara: toggle A and D.
  • Esme: toggle A and C.

The cabinet rules

A toggle reverses a light’s current state: off becomes on, and on becomes off. Each completed check toggled both named lights exactly once. Exactly one of the five checks was canceled; the other four happened once each.

No bulb failed, no switch was used by anyone else, and the initial and final states are verified. The order of completed checks is unknown, but toggles do not depend on that order. Two toggles of the same light cancel one another.

Identify the canceled visit and explain the final state. As a check, work through all four completed visits, or count how many times each light changes.

The cabinet artwork is atmospheric. Its visible switch count, bulb colors, and apparent lit states do not represent the four named indicators. The text gives the complete state record.

Hint 1 - reveal when you want a nudge

First determine what would happen if all five visits took place. Count toggles of each light.

Hint 2 - reveal when you want a nudge

With all five visits, A and C would be on. Which single omitted pair changes that predicted outcome into A and B on?

Reveal the solution and explanation

Basil’s visit was canceled.

With all five visits completed, A would toggle three times, B twice, C three times, and D twice. The predicted lit pair would therefore be A and C.

Omitting Basil’s B-and-C toggle changes that prediction: B switches from even to odd, and C from odd to even. The final lit pair becomes A and B, exactly as observed.

Check the four actual visits directly: Ada, Clio, Dara, and Esme toggle A three times, B once, C twice, and D twice. Only A and B finish on.

The five possible omissions give different outcomes: omitting Ada leaves B,C on; Basil leaves A,B; Clio leaves A,D; Dara leaves C,D; Esme leaves every light off. Only Basil’s cancellation fits.

Solve another: The Cabinet of Fifty Mysteries · Browse all 50 cases
The Porter’s One-Swap Claim

Case 26 · visual · Medium · About 4–7 minutes

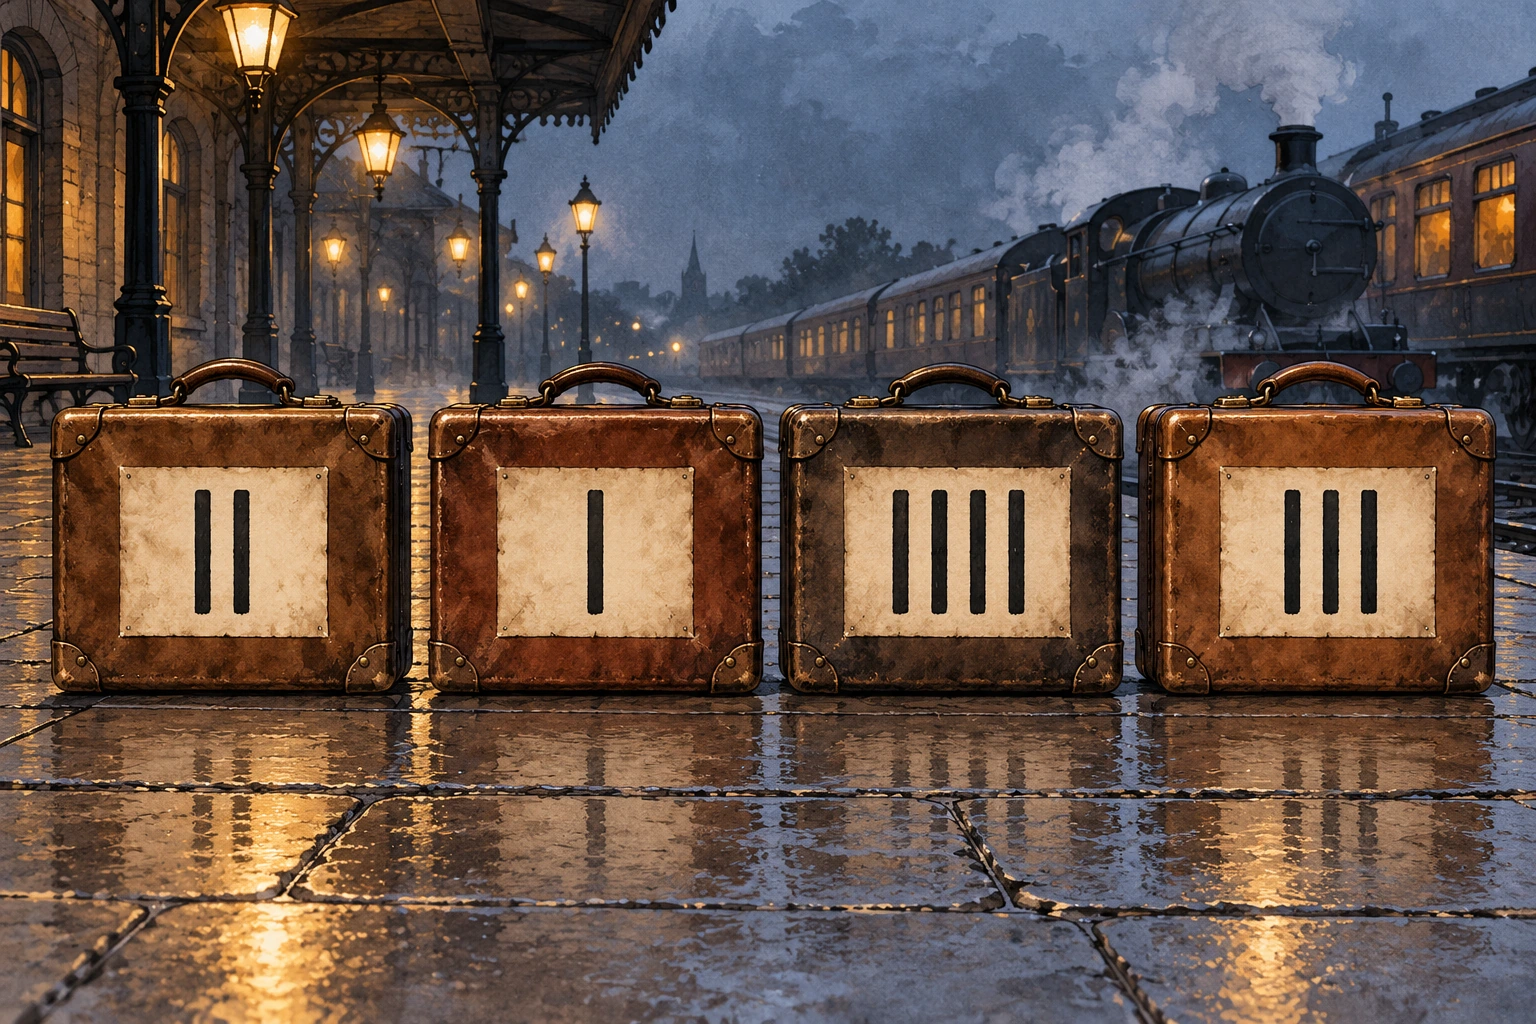
Four station suitcases with tally patches showing two, one, four, and three bars.
Tally counts and their left-to-right order are clues; the railway background is decorative.

The museum’s luggage is waiting beside the night train. Each suitcase has a tally patch indicating its place in the loading order. The correct arrangement runs from one bar to four bars, left to right.

A porter claims the pictured row can be restored with just one exchange of neighboring cases. Vale checks the claim before approving the loading log.

The movement rule

  • A move exchanges two suitcases currently next to one another.
  • Only that pair changes position in the move. You cannot lift a case over another, reverse the whole row, or exchange a separated pair.
  • All four cases must finish in increasing tally order: 1, 2, 3, 4.
  • Each tally count occurs exactly once. The patches never change.

Picture evidence

Accessible evidence transcript: The four tally patches show, from left to right, two vertical bars, one bar, four bars, and three bars. In shorthand, the row is 2–1–4–3.

Is the porter’s claim possible? Find the minimum number of legal moves and name the pair exchanged in each. If more than one shortest move order exists, acknowledge it rather than claiming that a particular sequence is unique.

Only the tally patches define order. Suitcase size, station lighting, and the train behind them are not clues. Each exchange counts as one move even though two cases move at once.

Hint 1 - reveal when you want a nudge

There are two pairs currently in the wrong relative order. Consider 2 versus 1, and 4 versus 3.

Hint 2 - reveal when you want a nudge

One adjacent exchange reverses the relative order of only the two cases exchanged.

Reveal the solution and explanation

The claim is false. The minimum is two moves. Exchange the neighboring 2 and 1, then exchange the neighboring 4 and 3. This gives 1–2–3–4.

The two moves may be performed in either order. Swapping 4 and 3 first gives 2–1–3–4, after which swapping 2 and 1 finishes the task. Thus there are two shortest move sequences, with the same required exchanges.

For the lower bound, 2 must pass 1, and 4 must pass 3. An adjacent swap changes the relative order of just its exchanged pair; other pairs retain their relative order. One move cannot correct both reversed pairs.

At least two moves are necessary, and the constructions achieve two. That proves the unique minimum value while honestly retaining both valid shortest sequences.

Solve another: The Cabinet of Fifty Mysteries · Browse all 50 cases
One True Statement at the Empty Plinth

Case 25 · logic · Medium · About 4–7 minutes

A small display box has been moved from its plinth. Ari, Bea, and Cal were the only people with access, and the museum’s tracking system confirms that exactly one of them moved it.

Each gives one statement. A reliable interview protocol establishes that exactly one statement is true and the other two are false.

Three empty interview chairs in a museum anteroom near an empty display.
The quoted statements and closed rules contain all evidence.

The statements

  • Ari: “Bea moved the box.”
  • Bea: “Ari’s statement is false.”
  • Cal: “I did not move the box.”

The closed rules

“Ari’s statement” means the quoted sentence above, not something Ari said elsewhere. Every sentence is evaluated literally against the same event. A false statement does not establish a person’s usual honesty, and the mover is not assumed to be either the truthful speaker or a liar.

No one outside the three named people could be the mover. Exactly one person moved the box, and exactly one of the three quoted statements is true. There are no shared actions, changing meanings, or hidden extra statements.

Who moved the box, and whose statement is true? Test every candidate, or use the relationship between Ari’s and Bea’s sentences to shorten the work. Explain why the other two candidate movers fail.

The chairs in the accompanying illustration provide a setting only. Seating position, facial expression, and nervous behavior play no role; no people are depicted.

Hint 1 - reveal when you want a nudge

Ari’s and Bea’s statements contradict each other. Exactly one of those two must be true.

Hint 2 - reveal when you want a nudge

The only allowed true statement is already among Ari and Bea. What must that make Cal’s statement?

Reveal the solution and explanation

Cal moved the box, and Bea’s statement is true.

Ari says Bea moved it. Bea says that assertion is false. Exactly one of those sentences is true regardless of which person moved the box. Since there is only one true statement altogether, Cal’s denial must be false. Cal therefore moved it.

Now check all candidates. If Ari moved the box, Ari’s accusation is false, Bea is true, and Cal’s denial is true: two truths. If Bea moved it, Ari is true, Bea is false, and Cal is true: again two truths.

If Cal moved it, Ari is false, Bea is true, and Cal is false: exactly one truth. This is the only candidate meeting the interview condition. No assumption about personality or guilt-related behavior is needed.

Solve another: The Cabinet of Fifty Mysteries · Browse all 50 cases
The Typewriter’s Six Slips

Case 22 · logic · Medium · About 5–8 minutes

Six short code slips have fallen from an archive envelope. The typist changed exactly one letter between successive codes, and every surviving slip belongs in the sequence.

Vale knows the beginning and ending. Can you restore the intervening order without inventing any missing words?

A vintage typewriter and blank paper slips on an archive desk.
The six code strings in the text are the complete evidence.

The recovered codes

LAMP, LIMP, LIME, LINE, LANE, LONE.

The typist’s rules

  • Use each of these six codes exactly once.
  • The first code is LAMP and the final code is LONE.
  • Between neighboring codes, exactly one letter position changes.
  • Letter positions cannot move. You may replace a letter, but may not insert, remove, or rearrange letters.
  • Only the six listed codes are allowed. Dictionary knowledge supplies no extra steps.

Restore the complete six-code sequence. “One letter changes” means compare the two four-letter strings position by position. For example, two differences would be an illegal step even if both strings are ordinary English words.

The archive guarantees that no slip was duplicated or forged. The mystery is their order. A quick legal path to LONE is not enough if it leaves a recovered slip unused. The typewriter picture is decorative; its keys and blank papers do not encode a seventh code.

Hint 1 - reveal when you want a nudge

LAMP has only one legal neighbor among the other five slips. Follow the forced beginning.

Hint 2 - reveal when you want a nudge

LINE can connect directly to LONE, but doing so would leave LANE unused.

Reveal the solution and explanation

LAMP → LIMP → LIME → LINE → LANE → LONE.

LAMP can reach only LIMP by changing one position. With LAMP used, LIMP can continue only to LIME. LIME then forces LINE.

At LINE, both LANE and LONE are legal neighbors. But LONE must be the final code, and choosing it now would strand LANE. Therefore LINE must lead to LANE, which reaches LONE by changing its second letter.

The changes in the completed sequence affect positions two, four, three, two, and two respectively. Each step changes exactly one letter. All six slips appear once, and the required endpoints are correct.

The forced beginning leaves only the final two unused slips. Their endpoint requirement fixes their order. Thus the recovered sequence is unique, even though the graph of legal one-letter links contains a tempting shortcut.

Solve another: The Cabinet of Fifty Mysteries · Browse all 50 cases

The Gallery’s Three Commands

Case 21 · visual · Medium · About 4–7 minutes

Three framed arrows in a gallery point left, up, and right.
Read the arrows using the fictional command rules. The gallery setting is decorative.

The museum’s old indexing game uses three framed arrows to transform a three-letter drawer code. A copied instruction sheet has survived, but the final code is missing.

Vale starts with the letters K M R in that order. Read the actual arrows in the gallery picture, then apply the commands carefully.

The instruction sheet

Read the frames from left to right. Apply each command once to the current row of three letters. Commands change letter positions; the arrows are not directions for walking.

  • Left-pointing arrow: move the first letter to the end. The other letters keep their order.
  • Up-pointing arrow: exchange the first and second letters. Leave the third letter alone.
  • Right-pointing arrow: move the last letter to the front. The other letters keep their order.

Begin with K M R. Never restart from that original row between commands. A final code is read from the resulting row, left to right, without spaces.

Picture evidence

Accessible evidence transcript: The left frame contains an arrow pointing left. The central frame contains an arrow pointing up. The right frame contains an arrow pointing right. No other marks inside the frames matter.

Which drawer code results? Write the row after each command so another investigator can check your reconstruction. The artwork’s bench and lighting supply no additional instructions. Nothing requires familiarity with a real museum security system.

Hint 1 - reveal when you want a nudge

After a command, keep the new row. The next command acts on that changed row.

Hint 2 - reveal when you want a nudge

The left arrow changes KMR to MRK. Now perform the exchange indicated by the middle frame.

Reveal the solution and explanation

The code is KRM. The full sequence is KMR → MRK → RMK → KRM.

The first frame points left, so K moves from the front to the end: MRK. The second points up, which exchanges the first two letters of MRK: RMK. The final frame points right, so the last letter K moves to the front: KRM.

Every command is deterministic. Once the initial row and pictured arrow sequence are fixed, there is no choice that could produce a second answer.

A tempting shortcut is to cancel the left and right commands before doing the middle one. They are separated by an exchange, so that shortcut changes the operation order. Acting on the row one step at a time avoids that mistake.

Solve another: The Cabinet of Fifty Mysteries · Browse all 50 cases

The Appointment That Never Happened

Case 20 · investigation · Medium · About 5–8 minutes

A courier submits four appointment cards to explain a morning’s movements. Vale knows that exactly one appointment was invented. The other three happened at their stated places and times.

Find the false card without guessing how quickly the courier walks. The case supplies fixed minimum travel times, and appointments take no time beyond the recorded instant.

A folio on a quiet station bench with branching tracks beyond.
All itinerary evidence is in the text.

The four cards

  • A: Harbor, 09:00.
  • B: Museum, 09:05.
  • C: Station, 09:15.
  • D: Gallery, 09:40.

Guaranteed travel limits

The minimum minutes between each pair of places are the same in either direction:

  • Harbor–Museum: 10; Harbor–Station: 12; Harbor–Gallery: 30.
  • Museum–Station: 15; Museum–Gallery: 20.
  • Station–Gallery: 20.

These are complete minimum travel times, already allowing the quickest permitted route. Waiting is allowed. The courier used no other transport or shortcuts. All cards use the same accurate clock. The invented appointment did not happen and imposes no stop on the real route.

Which card is false? Show that the three remaining appointments can form a possible journey. Then explain why deleting any other single card still leaves an impossible pair. You need not identify an exact street route; enough elapsed time between consecutive genuine stops establishes feasibility under these rules.

The illustration supplies atmosphere only. No shadow, rail line, or unmarked paper in it adds evidence.

Hint 1 - reveal when you want a nudge

Look for pairs of cards separated by less time than their stated minimum journey.

Hint 2 - reveal when you want a nudge

There are two impossible pairs, and they share one card.

Reveal the solution and explanation

Card B, Museum at 09:05, is false.

A and B are only five minutes apart, but Harbor–Museum requires ten. B and C are ten minutes apart, but Museum–Station requires fifteen. Both impossible pairs include B.

Remove B and the real journey works: Harbor at 09:00 to Station at 09:15 gives fifteen minutes for a twelve-minute trip. Station at 09:15 to Gallery at 09:40 gives twenty-five minutes for a twenty-minute trip. Spare time can be spent waiting.

Removing A leaves the impossible B–C pair. Removing C leaves A–B. Removing D leaves both. Therefore only B can be the single invented appointment. The argument identifies a false record, not a reason why the courier invented it.

Solve another: The Cabinet of Fifty Mysteries · Browse all 50 cases

The Elevator With Three Working Buttons

Case 50 · shortest-path challenge · Hard · About 10-15 minutes The archive elevator has a peculiar test mode. Its floor display works, but o...